
 Tweet
Tweet
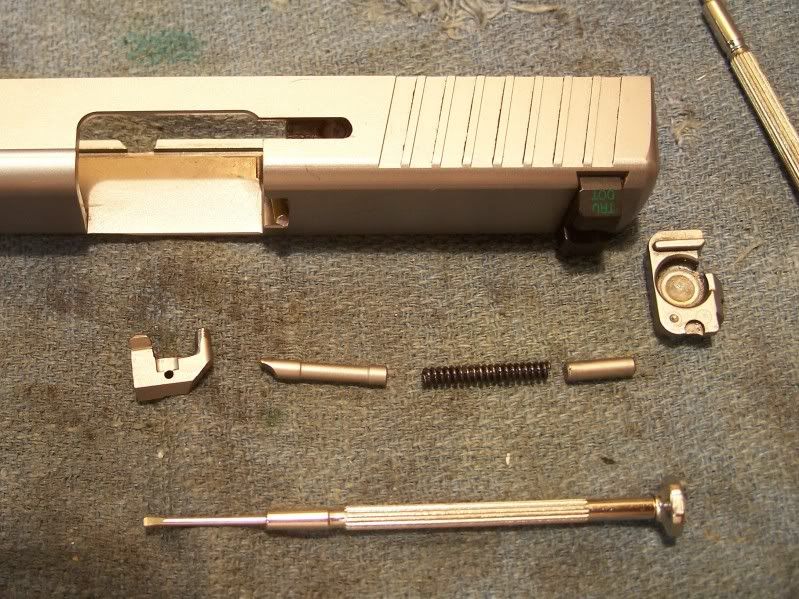
Be aware that the small opening in the rear is not fully open, there's only about 1/2 a hole there in which to use a small tool to push the retention spring away from the rear plate.
-
Judging by today's left wing, looks like Senator Joe McCarthy was right after all. -
True, the little hole is deceiving, it's smaller than it looks, you can push but if you don't hit the small half hole your not accomplishing anything.Originally posted by ripley16 View Post
Pyro, I'm glad you found the pieces, it's kind of like winning the lottery when you find the long lost part. Kind of a yee haw moment, been there many times.
That spring will actually improve a bit over time too once it acquires a little bit of a set. I ran the trigger gauge when I installed mine and there wasn't that much difference, but I had a pretty light end original. It improved a bit after one range visit. Does make a difference.http://bawanna45.wix.com/bawannas-grip-emporium#!
In Memory of Paul "Dietrich" Stines.
Dad: Say something nice to your cousin Shirley
Dietrich: For a fat girl you sure don't sweat much.
Cue sound of Head slap.
RIP Muggsy & TManComment
-
I have been using an eye glass screw driver too push the small circle but it will not budge. Is it that tight?Comment
-
First few times the rear plate can sometimes be hard to get started. Might have to depress that pin and pry a tad on the plate itself.
My first time I thought I was depressing but I really wasn't, then when I did get it pushed in the plate was tight. It's not hard if you know what to expect.http://bawanna45.wix.com/bawannas-grip-emporium#!
In Memory of Paul "Dietrich" Stines.
Dad: Say something nice to your cousin Shirley
Dietrich: For a fat girl you sure don't sweat much.
Cue sound of Head slap.
RIP Muggsy & TManComment
-
Try a drop of oil to penetrate the sides of the plate that fit together with the sides of the slide. Also mark your screwdriver with a pencil at the edge of the plate so you can see if you are depressing it. The spring need only move a few milimeters to relieve pressure on the plate. A thin blade, slotted screwdriver may be needed to pry and move the plate down initially.Last edited by ripley16; 08-09-2012, 05:13 AM.Judging by today's left wing, looks like Senator Joe McCarthy was right after all.Comment
-
Success! ! Got home from work last night, pulled the slide off the frame, took out the barrel and recoil spring, grabbed my tiny screw driver and pushed like mad. I finally felt it move!! Now I know what to look for. Thanks for the info!!!!!Comment
-
Glad it worked out for you. Strongly suggest doing the dis assembly inside a large plastic bag. Sort of like a motorcycle helmet. Won't prevent the explosion of parts but you'll be able to locate all the parts. sigpic
Sold all my guns. I dislike firearms.
NRA Life Member
NRA Certified Range Safety Officer
That notch in the rail is supposed to be there
"Laws that forbid the carrying of arms disarm only those who are neither inclined nor determined to commit crimes. Such laws make things worse for the assaulted and better for the assailants; they serve rather to encourage than to prevent homicides, for an unarmed man may be attacked with greater confidence than an armed man."
--Thomas Jefferson (1764).Comment
-
trying to change out the striker spring. I have 3,000 rds on it so it may be time. I spent 30 minutes trying to get the slide back off. Cant'. In the half moon, there are two places to push. Looking from the back, on the left, there is a ledge thingie that appears to be part of the slide back and to the right appears to be the back of the plunger. I have been pushing down on the left part which is part of the slide back. From what I am reading, I have been pushing down on the wrong (left) side of the half moon.Originally posted by Tinman507 View PostComment
-
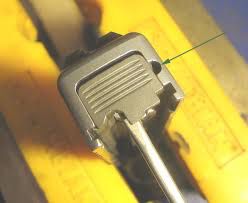
You need to push the pin part on the outside edge. The part on the inside is in fact part of the rear plate and is immovable. Use of a "Ripley Retractor " will keep the "parts from flying out".
Look at this picture that shows what the back plate looks like. Shown is the inside of the plate. Note the hole is about 75% closed. Only that small arc on the outside is open into the pin and allows you to compress the extractor spring. A small jewlers screwdriver works well. Hope this helps.
 Last edited by ripley16; 10-16-2012, 05:09 PM.Judging by today's left wing, looks like Senator Joe McCarthy was right after all.
Comment
-
Thanks. Got it. I was pushing the wrong side.Comment
-
I have
over 32K out ofmy PMJ9 and Ihave never changed the striker sprig. So so so rare for it to ever go bad, It can loose atadof power but the gun comes with around 6-7# striker spring, so It has alot of leeway to go before it can evergive issues. Ihave the 5# striker spring in my PMJ9 and it has een there for over 32K rounds, so I feel it has even less than 5# triger pull behind it, and again never an issue.Originally posted by deadhead1971 View Post
Its ur gun, so do as u see fit but your worrying about sumpin that really doesn't go bad like a recoil spring might, especially 3000 rounds.. My PM9 has over 34,000+ rounds through it, and runs much better than an illegal trying to get across our border
NRA BENEFACTOR MEMBER
MAY GOD BLESS MUGGSYComment
-
thanks. glad to see you still here.Comment
-
So, I changed out the striker spring in my P9 yesterday. I have to say that it was not real intuitive, and having to fashion a coat hanger to hold the striker, and finding just the right tiny screwdriver to push in the ejector spring was a PITA. I followed someone's advice and removed the back plate inside a zip lock bag... I completely missed catching the striker, and it shot clean through the bag, and took me about 15 minutes of crawling around my basement with a flashlight.
Anyway, got it all reassembled and working fine. Haven't fired it yet, but dry firing it compared to the wife's stock CW9, can't say we felt any difference. Perhaps it will loosen up a bit after some use.Comment
-
How To "Detail Strip" the Kahr's Upper!
I also changed my striker springs on my CW9 and my PM9. I dismembered a clothes hanger and made a Ripley Retractor tool. Grabbed the small screwdriver set I keep in my cleaning case, then some tape to keep the extractor from falling out (thanks to JFootin). I did it in the bag, but it wasn't needed; although, I can see the bag would be useful if the clothes hanger tool let go. I'm not sure what bag vanbo used, but be sure it is a thick freezer ziplock. I also realized the Ripley Retractor tool doesn't need to retract the spring very far, just far enough to clear the back plate... and that will make the spring shoot with less force if it does let go accidentally. So I made another longer tool for the second gun and that worked great. It was also easier to put on.
Any way, thanks to this forum, all went "smoother than expected" and I was thankful for that! Thanks guys!
The K9 is next.
Comment
-
How To "Detail Strip" the Kahr's Upper!
P.S. I only felt a slight difference, but I am confident the new spring will relax after a few rounds. The difference is initially very minor because the old spring is relaxed and the new spring is not, so the spring rate is probably not much different at that point. I don't think I would have noticed any difference if I didn't have the other I modified gun to compare it too.Comment
Comment